Acorn for Mac 6.0 轻巧简易型PS图像设计工具
每个人都需要在某些时候,编辑图像,但不是每个人都有时间去学习复杂的超级昂贵的图像编辑程序。这就是为什么我们创建了Acorn。使您的数码照片可以轻松添加文本和形状。
它拥有的快速,简单,流畅的良好品质和其拥有的photoshop基础工具、滤镜效果及支持图层功能,让其轻易成为替代PS的轻量级实用绘图工具
核心功能:
影像结合在一起来创建自己的。工作层接触您喜爱的照片或做一些新的东西从头。
*使用橡子采取截图马上和编辑它们。
*链在一起的图像过滤器,创造了惊人的效果
*层的图像编辑,一个行业标准。
*请使用您的内置iSight的新形象和层。
*简单的图像和画布大小调整,只需通过改变你的窗口的大小。
*利用您的显示器的每一个像素的全屏幕图像编辑。
*平板敏感压力笔触和使用平板电脑的橡皮擦。
*矢量形状和文字图层。
*任意多边形,椭圆形,矩形和魔杖选择。
*梯度。
*创建并应用自定义文字样式。
*控制为每个图层的不透明度和混合模式。
*使用Python脚本语言,以及在Objective-C编写插件。
* GPU通电。相同的显卡,使您的游戏体验更流畅,有助于橡子飞在最恶劣的图形操作。
What's New
Version 6.0:
New
Text on a path - Our #1 feature request. It's a big thing, and it's awesome. You can use the Shape ▸ Convert To Path Text menu item when selecting a shape, or you can use the Bezier Text Tool (which is a sub item under the Text Tool button) to click on a path and then start typing. To go along with this, we've added a new "Graduated Font Scale" shape processor, that increases (or decreases) your fonts on your paths, circles, or even in the old style boxes. Make fancy stuff™.
Clone tool works across layers, images, and more - Our #2 feature request, and another big thing. The clone tool can now work across layers, images, and can even use group or shape layers as a cloning source. If you'd like to reset the origin where the cloning starts, hold down the shift key when clicking. Using this technique, the clone tool can also function as a stamping tool. Keep the shift key held down if you'd like to clone in a straight line. Use the option click to define a new clone source, or just begin drawing. Shift click to reset the clone tool's origin.
New Web Export Features - You can now zoom and pan and use shortcuts to change the scale of your image. There are new options to convert your image to sRGB if it isn't already, and if you are exporting a wide gamut image (such as DP3), there's a new option to highlight he colors that are out of range of sRGB (available on 10.12+ only)! Web Export also has the option to keep (or remove) image metadata, such as exif properties.
Smart Layer Export Settings Palette - There's now a configurable palette to setup a layer's Smart Layer Export settings (which were originally introduced way back in Acorn 3.3). You now have a movable frame that represents the export bounds of your image, and you can even give it a real name and everything from there. In addition, you can choose to have your layer automatically export as @1x, @2x, @3x, etc. sizes.
New Bezier tools, stroke alignment, and boolean operations
You can now set the stroke alignment on shapes to be inner, outer, or center (which has always been the default you're probably used to).
Shapes now have a new boolean operation: Divide, which works on two selected overlapping shapes. In addition to this, when you hold down the option key when using the boolean shape operations, Acorn will keep the original shapes you selected in your layer. ALSO another thing- if you hold down the shift key when using the subtract boolean operation, it'll reverse the order of the shapes, so if you accidentally subtracted things in the wrong order, you can quickly undo and then try again with the shift key.
There are now Shape ▸ Bezier Stuff ▸ Simplify Path and Smooth Path menu items, which do exactly what they say.
There's a new option under the Shape ▸ Bezier Stuff menu item: "Reverse Path". If you drew a path from the right end of your canvas, to the left, and then added text to it, you text will go right to left, and upside down. This might not be what you're after. This new menu item will instead reverse your path, so that it goes the opposite direction. Tada!
When converting text to a bezier shape (via Shape ▸ Bezier Stuff), each glyph in the text box turns into its own path instead of the whole text block being a single path.
One last new thing- when using the pen tool + the shift key to add an anchor to a bezier shape, Acorn will now highlight where the new anchor location will show up.
Load and save color profiles, view wide gamut differences - Color profiles. Love them or hate them, if you do enough image editing you're going to need to use them at some point. Acorn 6 makes it easier than ever to load and save profiles to your image from the Color Profile sheet. And these days with wide gamut profiles showing up from your iPhone 7, you're going to want to know what pixels are going to change when you convert your painstakingly crafted DP3 image to sRGB for the web. And that's why we've added a new previewing option in Web Export that will show up when you're saving out a wide gamut image.
Make Shape from Selection - This new menu item, located under the Select menu, will be activated when you've placed selections on the canvas using the various vector options (rect, oval, freehand, etc). It'll also do the correct boolean options if you subtract or add to the selection. This is awesome if you want to add a stroke to your canvas selection.
Improved
Previously modal operations (like Crop, Scale and Rotate, Wrap) are now no longer modal. You can now switch between images without having to finish a crop in your current image.
The Scale and Rotate palette now show the x / y / width / height values of the transforming selection.
New shortcut to crop a single bitmap layer: Command-Shift-Option-K (or you can hold down the Shift key when using the Image ▸ Crop menu item). This works when a crop is on the canvas, or with a selection. If it's a selection, the command is basically a shortcut for invert selection, and then delete.
Instant Alpha gets two new options: the ability to turn on and off the smoothing of the edges, and a contiguous / non contiguous mode.
More New
File ▸ Export ▸ Export All Layers menu, which lets you pick a folder to export all your layers to.
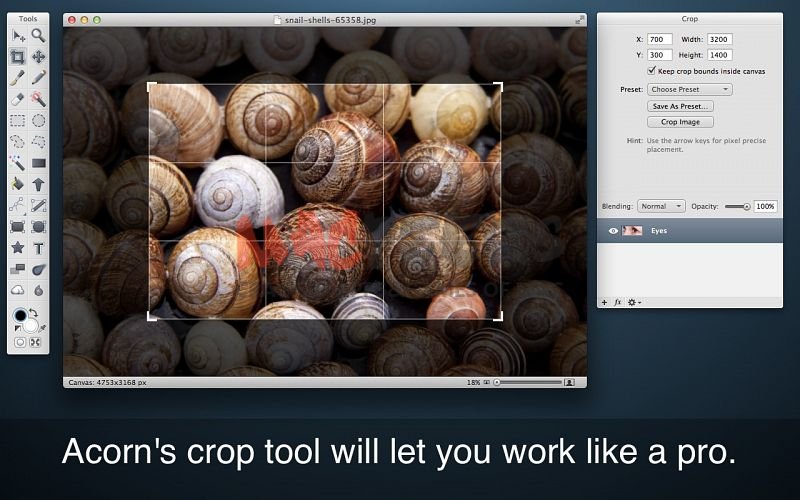
Crop pixel lock and resizing. The crop palette now has an option to lock dimensions. Which you click this, it'll "lock" your crop and the final size of your image will be whatever the pixel dimensions you have set are. For instance, let's say you add a 100x100 size crop on your image, and then press the lock. Then you resize the crop on the canvas to be something larger. When you hit crop, your image will crop to what you've got, and then resize your image down to 100x100. So you can essentially set your image size at the same time you're making a crop.
New "Reflection" filter, which reflects your image as if it was on a shiny table.
New "Linear Gradient Blur" filter, which works just like the radial gradient blur… only without the radial. It's linear (see- it's right in the name that's how you know it's linear).
Softness sliders have been added to the brush, clone, dodge, etc., palettes.
New Automator Action- "Call Filter Preset", which adds a filter preset to images via Automator.
The Filter menu now has a "Presets" sub menu.
New button in the palette to delete layers. You can also drag and drop a layer from the layers list into it for deletion
The shortcut Command-5 will zoom to 50%. And if you're already at 50%, Command-5 will then zoom to 25%. Command-4 will zoom to 800%, and then to 3500% if you're already at 800%. However, the menu items never updated their respective titles to indicate this. In Acorn 6, now they do.
There's now an option in the text palette to invert circle text.
After transforming a selection, Acorn will keep the selection on the canvas (previous versions of Acorn would clear it).
There's a new option in the Crop preset popup "Last Crop". This will place on your canvas the last crop you performed.
Text boxes now have an option for sub-pixel antialiasing in the Quick Config popover. (18294)
The web export window now has a proxy icon for your export data. So instead of saving your image, you can use the proxy icon to drag and drop your image anywhere that can accept the image.
You can now export CMYK TIFF images with depths of 32, 64, and 128 bits per pixel.
The Grayscale filter has a new "Black and white only" option, which works just like the 1bit filter does, but without any extra steps. This also works like a Threshold filter.
You can now use the $filename$ placeholder for the layer in in Smart Layer Export, which will replace it with the name of your document.
The info palette will now show the total pixel count, along with the amount of (uncompressed) memory your image takes up. Double clicking on the move tool (or pressing 'v' twice) will bring it up.
Double clicking or pressing enter on a bezier shape will switch to the the anchor selection tool.
New Superellipse option for boxes when they have a corner radius turned on.
When transforming a shape or selection, there are new options in the palette (and context menu) to flip your image horizontal or vertical.
Filled out the Edit ▸ Tools menu with all the available tools.
In most cases when you try an operation on a locked layer, Acorn would say 'Hey- it's locked. Do you want to unlock?' and if you choose yes it'll unlock and you can try again. In Acorn 6, if you say 'unlock' to that question, Acorn will continue with the previous operation so you won't have to try and do it again.
The meta-data window now shows the pixel dimensions, as well as saved file size of your image.
When cropping, you can hold down the option key + return to crop only the current layer (bitmap layers only).
Added a Boolean Divide option to the Touch Bar for selected shapes.
Added a Contiguous toggle button to the flood fill palette.
If you hold down the option key when selecting a color profile, it'll show you where it was loaded from on disk if available.
If you have a shape layer with processors in it and try and add a new shape, Acorn will no longer warn you that it can't do that. Instead, it'll just add a new shape layer and start adding your new shapes to that.
Changed
Text boxes now clip all text to the box they are set in. This means if your first line of text has a line height that pushes it outside the box it's in, then the text will now be clipped. And if you have a baseline that sends it below the box, then it'll also be clipped. Acorn did text a little sloppy in the past, and drew text outside those boxes- but it caused all kinds of little problems and artifacts to show up. Adding the clip cleans all those cases up. (And what's more- previous versions of Acorn would clip your text in _some_ cases, but not all. Now it's 100% consistent.
When moving a gradient stop, a tooltip is now show with the location of the stop in the gradient.
The shape boolean operations are now powered by Paper.js
The various Export options have been moved under a new File ▸ Export submenu.
When using the Randomize Anchor Location processor on star shapes, the star no longer has a non-closed shape.
The "Change Angle" Shape Processor has been renamed to "Rotate".
The layers list in the canvas contextual menu is now visually listed in the same order as what shows up in the layers palette list.
When moving or resizing a crop, the current x/y/width/height values are shown above the cursor.
Removed the option "Keep crop bounds inside canvas". Snapping to the canvas edges works well enough for this these days.
When switching to the Crop tool and there is a selection, Acorn automatically uses the selection bounds to place a crop on the canvas.
The Image ▸ Trim to Edges command will now crop out any layers who's dimensions fall outside the canvas bounds (even if there aren't any transparent pixels inside the canvas to trim up). (24197)
The Web Export window now tries to be the smallest it can be on Retina displays. (24115)
More accurate CMYK layer export, having to do with alpha blending.
The mirror filter no longer clamps its edges.
软件截屏:
System requirements 系统要求:
- OS X 10.7 or Later
下载地址:
相关下载:

